- Rejected Approaches
- Chosen Solution
- STOMP Connection
- Message Transmission
Say, we're chatting in a discord channel. The points at which we need to check the jwt token are: ①when upgrading to WebSocket protocol, ②when connecting to STOMP, ③when sending a message, etc. Steps 2 and 3 are not much of an issue, but a problem occurs at step 1. Let's find out what the problem is and come up with the best solution!
First, we need to understand the WebSocket upgrading process.
1. Initial HTTP Request
The WebSocket connection begins with an initial HTTP GET request,
which includes an Upgrade header asking to switch the protocol to
WebSocket.
GET /ws HTTP/1.1
Host: localhost:8080
Upgrade: websocket
Connection: Upgrade
Sec-WebSocket-Key: x3JJHMbDL1EzLkh9GBhXDw==
Sec-WebSocket-Version: 13
2. Server Response:
The server approves the WebSocket upgrade with a 101 Switching Protocols response.
HTTP/1.1 101 Switching Protocols
Upgrade: websocket
Connection: Upgrade
Sec-WebSocket-Accept: HSmrc0sMlYUkAGmm5OPpG2HaGWk=
3. Protocol Upgrade:
At this point, the HTTP protocol is upgraded to WebSocket, and further communication occurs through WebSocket frames rather than HTTP headers.
This means that, custom headers are only valid during the initial GET request. At this stage, it might make sense to try sending tokens via custom headers. However, once the WebSocket connection is established, all further communication is done via WebSocket frames, and HTTP headers are no longer used. Additionally, browsers do not allow certain custom headers to be included in WebSocket upgrade requests due to security reasons, such as preventing CSRF attacks.
Sol 2: Sending the Authentication Token with the First WebSocket Message
const socket = new SockJS(
  `http://localhost:8787/ws?token=${window.localStorage.getItem("authorization")}`,
);
https://github.com/whatwg/websockets/issues/16
The above issue is about allowing custom headers during the handshake process, but a Chrome WebSocket contributor argues that including it in the query string of the URL is also acceptable.
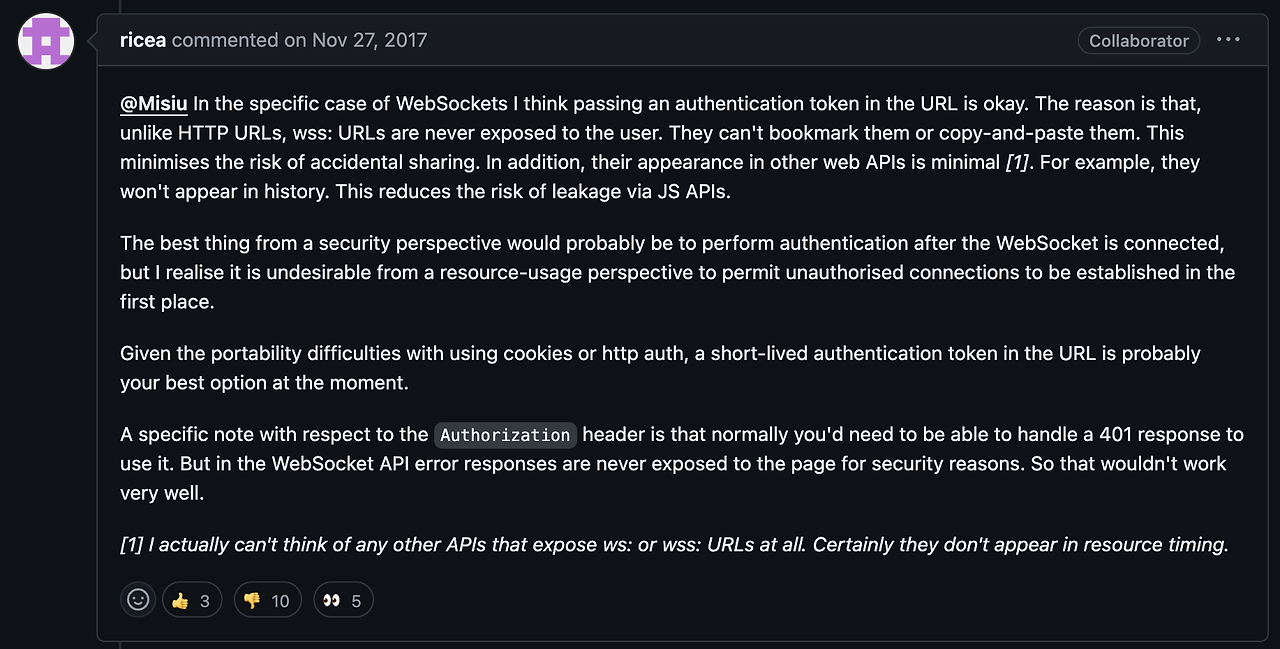
His reasoning can be summarized as follows:
- The WebSocket URL, unlike an HTTP URL, is not easily exposed, making it difficult for unauthorized users to access.
- It is minimally exposed through the JavaScript API, meaning that the information included in the query string is unlikely to be leaked through other web APIs.
- When using the Authorization header, you'd have to handle a 401 (Unauthorized) response, but WebSocket APIs do not expose error responses to the page for security reasons.
However, while technically viable, there’s often a lingering concern about security when sensitive information like a token is included in the URL, even if the actual risk is low.
In this method, after the WebSocket connection is established, the client sends the authentication token as part of the first message. This means the token is not included in the headers during the initial connection, but instead, the client sends a separate authentication message to the server once the connection is set up.
client.current = new Client({
  webSocketFactory: () => socket,
  onConnect: () => {
    client.publish({
      destination: "/app/auth",
      body: JSON.stringify({
        token: window.localStorage.getItem("authorization"),
      }),
    });
    subscribe();
  },
  // ...
});
However, this approach has several drawbacks:
- Resource inefficiency: Allowing unauthenticated WebSocket connections, even temporarily, can waste server resources as the server has to handle these connections before determining their validity.
- Additional overhead: This adds a bit of complexity to the communication protocol since the server must now wait for a separate authentication message after the WebSocket connection is established, introducing a small delay.
In this solution, the JWT token is included in the Sec-WebSocket-Protocol
header when establishing the WebSocket connection. The server then extracts and
verifies the JWT token from this header using a HandshakeInterceptor.
const socket = new SockJS("http://localhost:8787/ws", null, {
  protocols_whitelist: [
    "v10.stomp",
    "v11.stomp",
    "v12.stomp",
    window.localStorage.getItem("authorization"),
  ],
});import org.springframework.web.socket.server.HandshakeInterceptor;
import org.springframework.web.socket.WebSocketHandler;
import javax.servlet.http.HttpServletRequest;
import javax.servlet.http.HttpServletResponse;
import java.util.Map;
public class JwtHandshakeInterceptor implements HandshakeInterceptor {
@Override
public boolean beforeHandshake(HttpServletRequest request, HttpServletResponse response, WebSocketHandler wsHandler, Map<String, Object> attributes) throws Exception {
String jwt = request.getHeader("Sec-WebSocket-Protocol");
if (isValidJwt(jwt)) {
return true;
} else {
response.setStatus(HttpServletResponse.SC_UNAUTHORIZED);
return false;
}
}
@Override
public void afterHandshake(HttpServletRequest request, HttpServletResponse response, WebSocketHandler wsHandler, Exception exception) {
// Do nothing
}
private boolean isValidJwt(String jwt) {
// JWT validation logic
return true;
}
}Umm.. It seems to be very distorted.
CONS
- Limited browser support: Not all browsers fully
support passing authentication tokens through the
Sec-WebSocket-Protocolheader, which may lead to compatibility issues across different platforms. - Misuse of the header: The
Sec-WebSocket-Protocolheader is primarily intended for protocol negotiation, not for authentication, making this approach feel like a workaround rather than a proper solution. - Complex token management: Since this header can contain multiple values, managing authentication tokens within it may become unnecessarily complicated, especially in cases where multiple protocols are negotiated.
Including a short-lived authentication token in the query string may currently be the most practical and secure approach.
For convenience, I’ll refer to this as ST. This method solves the security issues I've encountered. Let’s go over the logic step by step:
[CLIENT]
- The client requests an ST using the JWT token.
[SERVER]
- The server receives the JWT, verifies it, and issues the ST.
- The ST has a very short lifespan, typically around 30 seconds.
[CLIENT]
- The client includes the ST in the query parameters when requesting the WebSocket upgrade.
[SERVER]
- The server extracts and verifies the ST using a
HandshakeInterceptor.
Once the WebSocket upgrade is complete, the STOMP connection and message transmission use the JWT.
async function connectWebSocket() {
  const jwt = window.localStorage.getItem("authorization");
  const secondaryToken = await getSecondaryToken(jwt);
  const socket = new SockJS(`http://localhost:8787/ws?token=${secondaryToken}`);
  // ... STOMP Connection Logic
}
Advantages of this method
- Short-lived ST: Since the ST has a very short lifespan, even if exposed, the risk is minimal.
- Limited scope: The ST is used solely for the WebSocket upgrade process, meaning it has more restricted permissions compared to a general access token.
- Independent management of WebSocket and JWT: Using an ST allows us to manage the WebSocket connection state independently of the JWT’s state. Even if the access token expires, we can request a new one before establishing the WebSocket connection, keeping the logic cleanly separated.
STOMP Connection
After the WebSocket upgrade is complete, we should set up the STOMP connection.
We can use the connectHeaders to pass and verify the JWT.
client.current = new Client({
  webSocketFactory: () => socket,
  connectHeaders: {
    Authorization: `Bearer ${window.localStorage.getItem("authorization")}`,
  },
  onConnect: () => {
    console.log("Connected successfully");
    // Subscribe, etc. after connection
    subscribe();
  },
});
Message Transmission
When sending messages, we can include the JWT in the message headers.
const sendMessage = () => {
  if (client && connected) {
    client.publish({
      destination: "/app/send",
      headers: {
        Authorization: `Bearer ${window.localStorage.getItem("authorization")}`,
      },
      body: JSON.stringify({ message: "Hello, World!" }),
    });
  }
};In the WebSocket upgrade process, we chose to introduce a secondary token. Afterward, the JWT can be used for the STOMP connection and message transmission.